There is hardly any question about the overwhelming benefits of a fast-loading web site: better search engine rankings, smoother user experiences, lower bounce rates and bandwidth savings, just to name a few. Moreover, web site speed optimization has become a special kind of craft that concerns top-notch online businesses targeting mass markets.
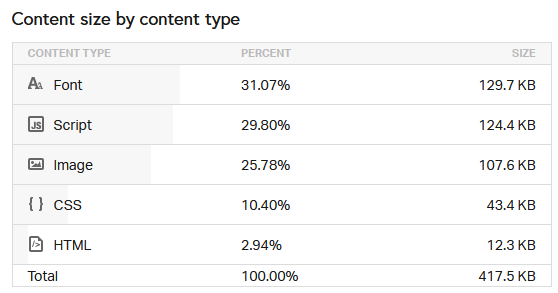
One of the most critical optimizations implemented by developers to speed up the performance of a website are font optimizations. Typesets and custom fonts represent a huge amount of the data in a single page load, as shown in this image of a Pingdom analysis for our site aprendemos.club
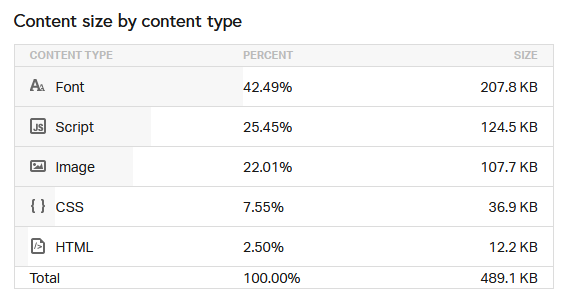
With these results, it is reasonable to try to optimize the delivery of custom fonts at our website, especially third party custom fonts such as Google Fonts and Font Awesome, both of which can impose a heavy burden on our website load if not managed properly. In this post, we will address specifically the different alternatives to optimize Font Awesome, the standard typeset for web page icons and social logos.
We will visit methods ranging from paid alternatives to more custom solutions, with the latter requiring you to get your hands dirty with coding, but will save you money at the end of the day.
Font Awesome Free Tier
Font Awesome basic kits (1,588 icons at this time), are free to use and can satisfy most needs. The free plan also includes hosting for 1 icon kit including the use of a fast CDN (Content Delivery Network). There are no payments nor credit cards required, but this free tier has one single drawback in terms of page-speed: all icons are loaded into your webpage, even if you do not use them, thus increasing dramatically the file size of your fonts.

In other words, no matter if you just need the usual Facebook, Twitter and Instagram social logos, the whole icon set (+1,500 icons) will be loaded right into your front page if you decide to use Font Awesome free plan. While the difference of speed can be negligible for most websites, it can be a deal breaker for online businesses relying on mobile experiences, or if your site requires a fine tune of images and icon sets.
Nevertheless, Font Awesome free plan is still a great choice for personal blogs, portfolios and small businesses, so we will get into more detail explaining the different ways to use this free plan.
Font Awesome WordPress Plugin
I have found this to be the most straightforward and stress-free way to use Font Awesome in my sites. Just install the official Font Awesome plugin for WordPress, and after a few tweaks you will be ready to go.
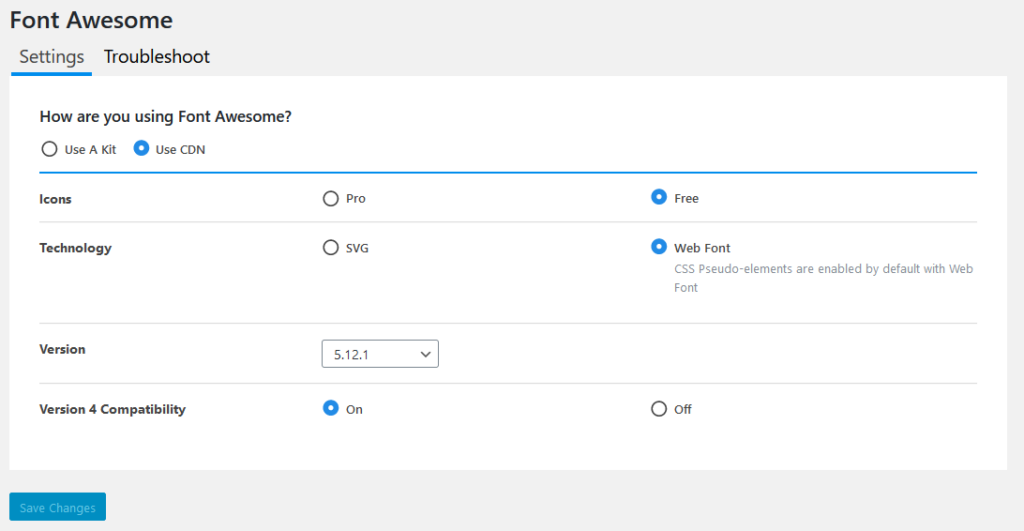
This plugin allows you to use the free and the pro versions of Font Awesome, change between different versions, add compatibility, and select between using a kit or Font Awesome CDN. Just keep in mind the free version does not allow you to modify the icon set.
Add Font Awesome to your Website with a Single Line of Code
If installing a WordPress plugin itches your back, or if for some reason you need to have Font Awesome installed selectively in specific pages of your site, then adding the kit using a single line of code is your way to go. You just need to visit your kit page at the Font Awesome website, retrieve the kit script code, and add it to the <head> section of your target pages. For example, see the instructions in the image below.
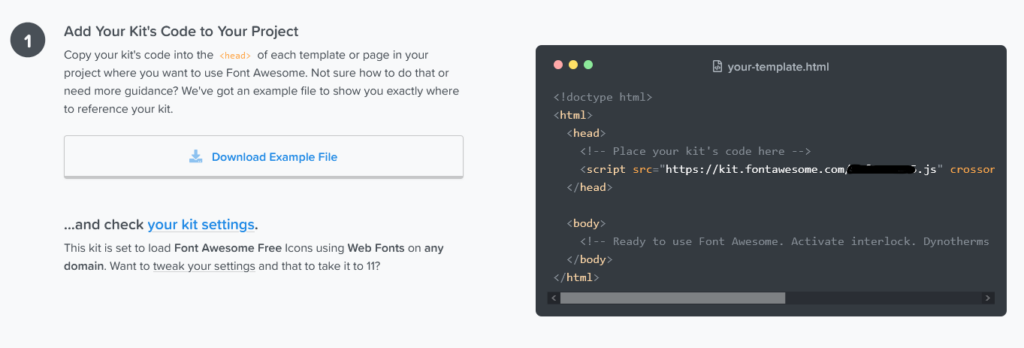
In this case, you just have to add this line of code in the header.php file of your WordPress theme if you want Font Awesome working in every page of your site.
<script src="https://kit.fontawesome.com/6ef2433c15.js" crossorigin="anonymous"></script>Host Font Awesome Locally
You can also opt for a higher degree of control and host Font Awesome yourself, delivering the font files directly from your own server along the rest of the code and assets of your site. This method requires a basic degree of knowledge with WordPress, and the general steps are the following:
- Download Font Awesome source files here.
- From the
/webfontsfolder, decide which font files to use (most likely you will be good with the .woff) - Copy the entire
/webfontsfolder and the/css/all.cssfile into your/wp-content/folder, within any subfolder of your preference (e.g./wp-content/fonts/) - Add a reference to your
/css/all.csswithin the<head>tag of each template where you want to use Font Awesome (i.e. in theheader.phpfile), using this single line of code:
<link href="/your-path-to-fontawesome/css/all.css" rel="stylesheet">With this method, we bypass the Font Awesome hosting and CDN, but gaining the advantages of managing your own Font Awesome installation. You will be still loading the whole set of icons in each load, but we are half way to an optimized a Font Awesome installation, for free.
Customizing the Icon Set and Optimizing the Font File
There are well known methods to optimize Font Awesome file size by means of removing unused glyphs from the font files. I have personally tried installing FontForge and purging any icon I might not use in my site. What you have to do, is to download the Font Awesome files (the ones with the free plan are good), open the .woff file with FontForge, and start cleaning any icon you will not use.
From the Font Awesome menu, you can go to “Encoding” and then select “Compact” to have a better view of the icons, and then “Clear” any you will not need. Then save the new .woff file, and upload this file along the all.css into the /wp-content/ folder, as described in the previous section.
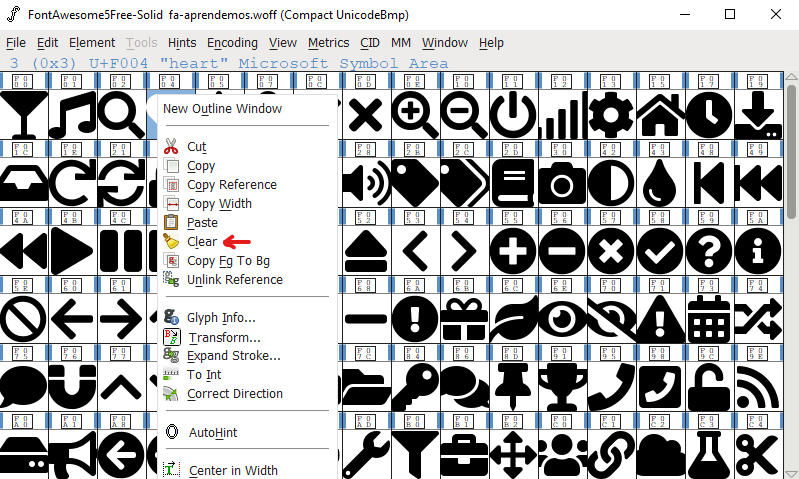
With this method, I turned a 110KB .woff file for Font Awesome into a 24KB file. That is almost 80% in file size saving, which will result in faster page loading, lower bounce rates and bandwidth savings. The image below shows the content size metric performance with the use of my reduced icon set.
I also noticed some advantages of serving files locally, with 2-3 less url requests that previously retrieved files from Font Awesome CDN. You can configure your own CDN to serve the static assets from your page.
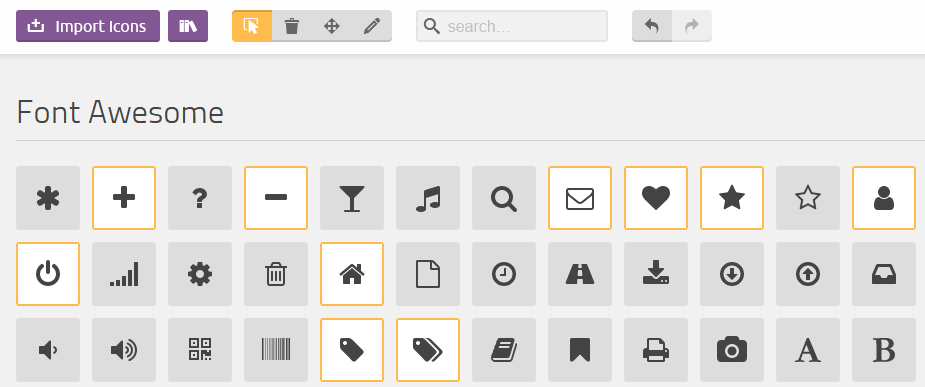
A second “easy method” consists of creating your own custom set of icons using tools such as IcoMoon, which has plenty of icons and other settings to build your own set. After you build your icon set, download the generated files and upload to /wp-content/, always referencing with the procedures described previously.
The previous self hosted methods can be very useful for anyone building a website from scratch, or for developers in much general environments (such as a local development run). In my experience, I realized when it comes to WordPress the desired file size optimization comes up much easier, with basic knowledge of HTML and CSS to edit corresponding files from the Font Awesome files included in your theme.
Font Awesome Optimization from WordPress Theme
Most modern WordPress themes come bundled with a local installation of Font Awesome, with files you can use for your tweak. While I worked in the new icon set files using FontForge, I had trouble shifting Font Awesome 4.7 references embedded in my WordPress theme using my new 5.13 Font Awesome file. I realized in my case it would be better to stick to Font Awesome 4.7, and simply run the optimization using the preinstalled files located at the theme folder, using the same techniques explained previously.
In my case, I use the Gist/Gist Grid theme by candid themes. I proceed to modify the /wp-content/gist/candidthemes/assets/framework/Font-Awesome/fonts/fontawesome-webfont.woff2 file with FontForge to trim the unused icons and reduce the file size. Then, I re-upload the revised .woff2 file to the corresponding folder, so the Gist theme can still make use of the file with the edits. And next time you load the fonts in your page, you can see a further decrease in the Font Awesome file size.
Conclusion
Depending on the size and target of your website, a couple optimizations to make more efficient the delivery and management of third party fonts can be useful. When it comes to Font Awesome, in most cases you will be in good hands with the free plan. However, if you decide to become a power user, a degree of knowledge with WordPress, HTML and CSS and a few tweaks are a smarter move than paying upfront for the 99$/year Font Awesome Pro subscription.


